e4开始,可以不使用代码或xml进行服务注册和寻找,而使用依赖注入进行装配
MANIFEST.MF
为了管理一组Java类和资源,通常我们会将其打包为JAR(Java Archive File,java存档文件),该文件以ZIP格式进行打包。
在JAR文件中,会包含一个META-INF/MANIFEST.MF文件,作为该JAR包的清单文件,设置执行入口类和支持库的路径等信息。
主要内容包括:
- Manifest-Version
- Class-Path
- Created-By
- Main-Class
OSGi bundle
OSGi的目标是实现Java应用的模块化,其目标是:
- 将程序封装成一个个的模块(在OSGi中叫做bundle)
- 模块向外只暴露特定的接口,内部实现对外不可见
- OSGi容器管理模块的接口,包括服务发布、寻找和版本管理等
- OSGi容器管理模块的生命周期,比如启动、停止、热插拔等
OSGi将每个模块打包为一个JAR文件。为了实现上述目标,
OSGi规范利用了MANIFEST.MF文件,在其中增加了一些bundle的描述信息,比如:
- Bundle-ManifestVersion
- Bundle-Name
- Bundle-SymbolicName
- Bundle-Version
- Bundle-ClassPath
- Bundle-Vendor
- Bundle-Localization
- Bundle-RequiredExecutionEnvironment
- Export-Package
- Require-Bundle
- Bundle-Activator
- Bundle-ActivationPolicy
- Import-Package
OSGi服务的注册和寻找
OSGi模块中,只有Export-Package中声明的包才可以被其他模块访问。为了避免一个模块对其他模块的直接引用,
通常会实现一个“接口定义”模块和多个“接口实现”模块。通过服务注册和发现的方式进行服务的使用。
OSGi还可以为模块指定一个”激活类(Bundle-Activator)“,
这个类会在模块启动时被执行,通常在这里进行本模块的接口实现(服务)的发布,以及向本模块内的类注入其他模块实现的接口(服务).
比如:
1 | public class MyActivator implements org.osgi.framework.BundleActivator{ |
这样,其他使用该服务的模块可以寻找服务。通常,也是在”激活类(Bundle-Activator)“中进行:
1 | public class ClientActivator implements BundleActivator{ |
Declarative Service
上面通过代码的方式进行服务的注册和寻找,实现起来比较繁琐。为了简化编码,从OSGi4.0版本开始,提出了”Declarative Service“标准,
使用xml文件进行服务发布和引用的描述。
首先,在MANIFEST.MF文件中增加一个新的属性Service-Component,用来指定服务声明文件的路径,比如:
1 | Service-Component: OSGI-INF/component.xml |
然后编写服务声明配置:
1 | <?xml version="1.0" encoding="UTF-8"?> |
该文件中也可以配置服务引用:
1 | <reference bind="setMyService" cardinality="1..1" interface="MyService" name="myservice" policy="static" unbind="unsetMyService"/> |
可以用如下的代码使用所引用的服务:
1 | // Method will be used by DS to set the service |
e4中的依赖注入
Declarative Service的方式与Spring的服务组装很类似。但是Spring中已经开始使用注解代替繁琐的XML配置。
从Eclipse e4开始,已经支持使用JSR330:依赖注入规范实现服务的注入。
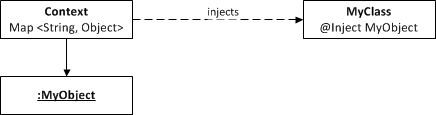
在e4增加的服务编程模型中,引入了上下文(context),所有的依赖对象都被上下文管理并通过上下文获取:
在Eclipse e4中,将全局的上下文分成了多个层次:

下层的context可以获取上层context中定义的对象,比如:

e4中,可以使用JSR330中基本的@Inject、@Named等注解,用于构造器、方法和属性。同时,e4在org.eclipse.e4.core.di.annotations包中也定义了一些扩展的注解,包括:
@Optional:声明一个注入(@Inject)为可选@GroupUpdates:声明一个注入的对象是批量更新的,使用这个注解对于RCP应用的性能有很大好处@Execute@CanExecute@Creatable
下面是e4中依赖注入的一些例子:
1 | // Tracks the active part |
在org.eclipse.e4.core.contexts包中定义的@Active注解可以获取活动(actived)组件。比如:
1 | public class MyOwnClass { |
创建自己的可注入对象
@Creatable