用户故事
scrum的用户故事要有弹性,要能够容纳变化。要素:用户角色、功能需求、目的、测试要点。
一个有用的模板如下:
作为【用户的类型】,我希望可以【先这样做,然后那样做,就应该得到…的结果】以便【业务价值】。
用户故事只描述一个功能(feature),而且每个用户故事的开发周期不要太长(1-5天)
本文中的用户故事如下:
作为运维人员,我希望可以通过web界面管理salt-key,包括查询、添加、删除等,
这样我就不用每次都登录到master服务器进行相应的操作。
领域模型
敏捷方法并不排斥设计和建模。实际上,领域模型及可以对用户故事进行抽象,也可以帮助发现用户故事。
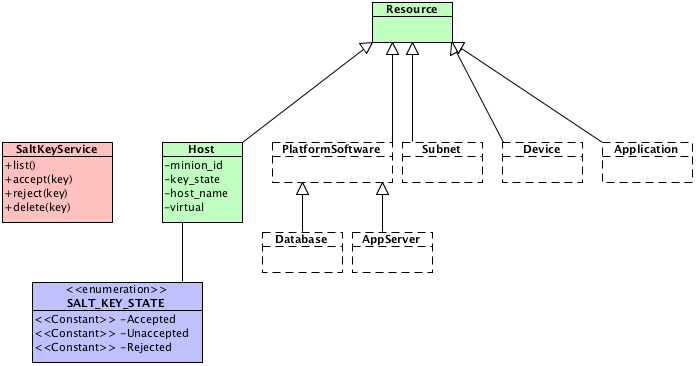
本文中,salt master 管理 salt minion。而minion实际上是一个主机(Host,
包括虚拟机Virtual Host)。 Host 安装了 salt-minion 后,通过 minion-id 向
salt-master 注册自己,而 salt-master 决定是否 接受该minion的注册请求。
如果从整个项目(运维操作平台)的视角来看,我们要管理的不仅仅是主机,甚至后续
grains 信息中的操作系统、IP地址等,
以及通过state安装的平台软件,都是需要管理的资源。资源还可能包括网络设备、子网等物理、虚拟资源。
所以有必要抽象出一个【资源】的实体,【主机】是【资源】的一个子类,【主机】可以有=minion-id=属性。
salt master 维护了salt keys的清单,包括 =Accepted Keys=、=Unaccepted
Keys=、=Rejected Keys=。
领域模型的设计如下:

其中=SaltKeyService=通过调用=salt-key=命令,执行list、accept、reject等操作,并根据操作结果更改=Host=实体。
=list()=操作,后续可以加入到定时任务。
开发准备
这部分内容不属于本文,但作为一系列开发培训的一部分,这里再次强调一下版本管理:
1
2
3
| git pull # 获取最新版本
git checkout -b feature-admin_minion develop # 基于develop 分支创建 feature-admin_minion 分支
git push origin feature-admin_minion #提交分支
|
RESTfulAPI 与 前后端分离
为了前后端分离,本项目中 Angular 和 Flask 通过 RESTful API
进行整合。所以有了领域模型之后,就要进行RESTful API设计。
具体Endpoint设计如下:
- /resource/hosts
- GET:
查询所有的主机。允许的查询条件(query_params):limit,offset,sortby,order,properties
- POST: 增加新的主机
- resource/hosts
基于API,前端开发人员可以在API_ROOT文件夹中增加静态json文件来调试,而后端开发人员可以通过对应的URL进行检验。
后端开发
models
本项目中使用了 Flask-SQLAlchemy
插件。模型的代码如下(由于Resource容易引起歧义,模型中使用=OpsResource=以便区分):
1
2
3
4
5
6
7
8
9
10
11
| from ops import db
class OpsResource(db.Model):
id = db.Column(db.Integer, primary_key=True)
comment = db.Column(db.Text)
class Host(OpsResource):
id = db.Column(db.Integer, db.ForeignKey('ops_resource.id'), primary_key=True)
hostname = db.Column(db.String(50))
virtual = db.Column(db.String(50))
minionid = db.Column(db.String(50))
keystate = db.Column(db.Enum('Accepted', 'Unaccepted','Rejected', name='SALT_KEY_STATE'))
|
创建数据库的脚本=createdb.py=如下:
1
2
3
4
5
6
7
8
9
10
11
| import os,sys
root = os.path.dirname(__file__)
sys.path.insert(0, os.path.join(root, './'))
from ops import app,db
import config
app.config.from_object('config.DevelopmentConfig')
db.create_all()
|
services
略
views
本项目中使用了 Flask-RESTful 插件。注册view的代码为:
1
2
3
4
5
6
7
8
9
| from flask.ext.restful import Api
from ops import app
from resource import *
API_ROOT = '/api/'
api = Api(app)
api.add_resource(HostResource, API_ROOT+'resource/hosts', API_ROOT+'resource/hosts/<int:id>')
|
实现view的代码如下:
1
2
3
4
5
6
7
8
9
10
11
12
13
14
15
16
17
18
19
20
21
22
23
24
25
26
27
28
29
30
31
32
33
34
35
36
37
38
39
40
41
42
43
|
from flask import request
from flask.ext.restful import abort, Resource, fields, marshal_with, marshal
import json

from ops.models import Host
from ops.services import SaltService

host_fields = {
        'id': fields.Integer,
        'hostname': fields.String,
        'minionid': fields.String,
        'keystate': fields.String,
        'virtual': fields.String,
        'comment': fields.String,
    }

class HostResource(Resource):
    @marshal_with(host_fields)

    def get(self, id=None):
        salt = SaltService()
        salt.list()

        if not id:
            hosts = Host.query.all()
        else:
            hosts = Host.query.filter_by(id=id).first()
        return hosts

    def post(self):
        host = marshal(request.data, host_fields)
        db.session.add(host)
        db.session.commit()

        return {'msg':'post successfully! '}


    def delete(self, id):
        pass

    def put(self, id):
        pass
|
后端测试用例
(TODO)
前端开发
安装需要的插件
1
2
3
| cd PROJ_ROOT/web
bower install angular-bootstrap -S
bower install restangular -S
|
配置app.js
1
2
3
4
5
6
7
8
9
10
11
12
13
14
15
16
17
18
| angular
.module('webApp', [
...
'ui.bootstrap',
'restangular',
...
])
.run(function (){
console.log('app run');
})
.config(function ($routeProvider,RestangularProvider) {
console.log('app config');
RestangularProvider.setBaseUrl('/api/');
$routeProvider
.when(
...
|
脚手架
1
| yo angular:route host/list
|
会自动在=scripts/app.js=中增加路由,创建=scripts/host/list.js=、=views/host/list.html=文件,并在=index.html=
中增加=scripts/host/list.js=的引用。
此时已经可以访问 http://0.0.0.0:9000/#/host/list 了。
实现RESTful API调用
PROJROOT/web/app/scripts/host/list.js
1
2
3
4
5
6
7
8
9
10
11
|
angular.module('webApp')
  .controller('HostListCtrl', function ($scope,Restangular) {
    console.log('@HostListCtrl');

    var url = Restangular.all('resource/hosts');

    url.getList().then(function(hosts) {
       $scope.hosts = hosts;
      });
  });
|
添加测试数据
根据前面的RESTful API约定,可以创建静态的json文件用于前端开发测试。
- `PROJ
ROOT/web/app/api/resource/hosts`
1
2
3
4
5
6
7
8
9
10
11
12
13
14
15
16
| [
{
"comment": "comment1",
"hostname": "host1",
"id": 1,
"keystate": null,
"minionid": "minion1",
},
{
"hostname": "host2",
"id": 2,
"keystate": "Accepted",
"minionid": "minion2",
"virtual": "vmware"
}
]
|
- `PROJ
ROOT/web/app/api/resource/hosts/1`
编写html模板
`PROJROOT/web/app/views/host/list.html`
1
2
3
4
5
6
7
8
9
10
11
12
13
14
15
16
17
18
19
20
21
22
| <div class="container" ng-controller="HostListCtrl">
<ol class="breadcrumb">
<li ><strong>资源</strong></li>
<li class="active"><strong>主机</strong></li>
</ol>
<table class="table table-striped">
<tr><th width="20%">主机名</th><th width="20%">minionid</th><th>key状态</th><th>虚拟化</th><th>操作</th></tr>
<tr ng-repeat="host in hosts | orderBy: '-id'">
<td><a ng-href="/#/{{host.id}}">{{host.hostname}}</td>
<td>{{host.minionid}}</td>
<td>{{host.keystate}}</td>
<td>{{host.virtual}}</td>
<td>
<button type="button" class="btn btn-primary btn-xs">更新</button>
<button type="button" class="btn btn-danger btn-xs">删除</button>
</td>
</tr>
<tr>
<td><button type="button" class="btn btn-success">增加主机</button></td><td></td><td></td>
</tr>
</table>
</div>
|
前端测试
此时,在 http://0.0.0.0:9000/#/host/list
已经可以看到json文件中的数据了。
但是,更严谨的做法是写单元测试。
(TODO)
集成测试
实现集成测试最简单的方式是:前端开发完后,作为后端Flask的static。
在搭建一个“现代化”的web开发环境中,
我们已经修改了grunt配置的`dist`,所以只要修改Flask中的一些配置:
1
2
3
4
|
app = Flask(**~name~\_**,static~urlpath~='')

@app.route('/') def index(): return redirect('/index.html')
|
参考资料
白话SCRUM 之二:product backlog
http://blog.csdn.net/dylanren/article/details/7072734
Scrum 之 product Backlog http://www.zhoujingen.cn/blog/2767.html
领域驱动设计(精简版)
http://www.infoq.com/cn/minibooks/domain-driven-design-quickly-new
scrum和分支管理策略
http://holbrook.github.io/2015/05/05/git\_branch\_within\_scrum.html
SQLAlchemy继承关系映射
http://docs.sqlalchemy.org/en/rel\_1\_0/orm/inheritance.html
【工具】bootstrap表单构造器
http://www.bootcss.com/p/bootstrap-form-builder/
