0%

快速开始

因为Fuse的核心组成部分是ServiceMix
所以“用Fuse开发WebService”也就是“用ServiceMix开发WebService”。

[ServiceMix提供了大量的开发工具(http://search.maven.org/#search%7Cga%7C1%7Corg.apache.servicemix.tooling),

其中servicemix-cxf-code-first-osgi-bundle是用于开发“代码优先”的Web Service的一个maven archetype。可以快速创建一个demo:

1
2
3
4
5
6
7
mvn archetype:generate  \
-DarchetypeGroupId=org.apache.servicemix.tooling \
-DarchetypeArtifactId=servicemix-cxf-code-first-osgi-bundle \
-DarchetypeVersion=2013.01 \
-DgroupId=thinkinside.demo.fuse \
-DartifactId=webservice-demo \
-Dversion=1.0.0-SNAPSHOT

会创建如下结构的一个工程:

webservice工程目录结构

pom.xml来看,这是一个使用maven-bundle-plugin构建的OSGi bundle工程

Apache CXF与Spring

上面的工程中包含了`META-INF/spring/beans.xml’文件:

1
2
3
4
5
6
7
8
9
10
11
12
13
14
15
16
<?xml version="1.0" encoding="UTF-8"?>
<!-- Generated by Apache ServiceMix Archetype -->
<beans xmlns="http://www.springframework.org/schema/beans"
xmlns:xsi="http://www.w3.org/2001/XMLSchema-instance"
xmlns:jaxws="http://cxf.apache.org/jaxws"
xsi:schemaLocation="
http://www.springframework.org/schema/beans http://www.springframework.org/schema/beans/spring-beans.xsd
http://cxf.apache.org/jaxws http://cxf.apache.org/schemas/jaxws.xsd
http://www.springframework.org/schema/osgi http://www.springframework.org/schema/osgi/spring-osgi.xsd">


<jaxws:endpoint id="HTTPEndpoint"
implementor="thinkinside.demo.fuse.person.PersonImpl"
address="/PersonServiceCF"/>

</beans>

说明这个bundle依赖ServiceMix中集成的Spring DM插件
可见,该工程中使用了Spring DM。

之所以在ServiceMix中既有Apache Areis Blueprint,又有Spring DM,是因为有很多遗留系统是基于Srping的。比如,Apache CXF就专门提供了使用Sping集成和发布WebService的机制

上面beans.xml中的<jaxws:endpoint>标签,就是由CXF提供的专门用于spring的schema中定义。

在ServiceMix中,CXF通过OSGi bundle: cxf-bundle-compatible被容器管理。

部署到ServiceMix

执行mvn package后,得到webservice-demo-1.0.0-SNAPSHOT.jar,这是一个OSGi bundle。可以将jar文件部署到

$SERVICEMIX_HOME/deploy/目录中。正常情况下,bundle的依赖关系被满足,该bundle会被自动启动。
此时访问http://localhost:8181/cxf,应该能够在Apache CXF服务清单中看到beans.xml中定义的web service。

从ServiceMix到Fuse

上述的过程也适用于JBoss Fuse。

但是Fuse对ServiceMix进行了再次封装,需要使用Fuse对应的版本。比如,servicemix-cxf-code-first-osgi-bundle的版本可能要使用2012.01.0.redhat-60024这样的“Fuse版本号”,否则在部署到Fuse是可能会发生版本不匹配的问题。

Fuse提供了一个maven仓库,专门提供这种定制版本的组件,需要在maven中配置:

1
2
3
4
5
6
7
8
9
10
<repository>
<id>fusesource</id>
<url>http://repo.fusesource.com/nexus/content/groups/public/</url>
<snapshots>
<enabled>false</enabled>
</snapshots>
<releases>
<enabled>true</enabled>
</releases>
</repository>

曾几何时,你在Spring和OSGi之间摇摆不定;曾几何时,你对SpringDM感到迷惑不解。你是否向往OSGi的动态特性,又为遗留代码(尤其是基于Spring的代码)感到不舍?现在,这些都不再是问题!

曾几何时,你在Spring和OSGi之间摇摆不定;曾几何时,你对SpringDM感到迷惑不解。
你是否向往OSGi的动态特性,又为遗留代码(尤其是基于Spring的代码)感到不舍?

现在,这些都不再是问题!

OSGi Service Platform Release 4 V4.2中,
提到了很多的企业级规范(Enterprise Specification)
其中包括了规范121:Blueprint容器规范(Container Specification)。

Buleprint容器规范规定了一个OSGi容器(不是OSGi rumtime)的方方面面:

Buleprint(或者说,OSGi Enterprise)目前有两个主要的实现:Eclipse GeminiApache Aries

其中Gemini的代码最初来自Spring DM,其实Blueprint规范的最早版本也来自Spring;而Aries已经用在Apache的众多企业级产品中。

在本文中,使用Aries Blueprint。

依赖注入

Blueprint Container 规范为 OSGi 定义了一个 依赖性注入(DI,Dependency Injection)框架,可以处理OSGi 的动态特性。
OSGi服务OSGi Declarative Service,不同,Blueprint依赖注入可以处理POJO对象的装配,使得POJO能够在OSGi中跨bundle访问。

这与JSR330:Java依赖注入规范很像,是该规范在OSGi环境下的扩展。
这也就是Spring DM(Spring Dynamic Modules)干的事情。实际上,Buleprint容器规范最初就来自于Spring,
而其Gemini实现更是来自SpringDM的捐赠。

无奈,如今Spring已经宣布放弃OSGi正所谓造化弄人,让人唏嘘不已。

Blueprint XML

Blueprint使用XML文件描述装配关系,下面是一个例子:

1
2
3
4
5
6
7
8
9
10
11
12
13
14
15
16
17
18
19
20
21
22
23
24
25
26
27
28
29
30
31
32
33
34
35
36
37
38
39
40
41
42
43
44
45
46
47
48
49
50
51
52
53
54
55
56
57
58
59
60
61
62
63
64
65
66
67
68
69
70
71
72
73
74
75
76
77
78
79
80
81
82
83
84
85
86
87
88
89
90
91
92
93
94
95
96
97
98
99
100
101
102
103
104
105
106
107
108
109
110
111
112
113
114
115
116
117
118
119
120
121
122
123
124
125
126
127
128
129
130
<?xml version="1.0" encoding="UTF-8" standalone="no"?>
<blueprint xmlns="http://www.osgi.org/xmlns/blueprint/v1.0.0">

<!-- Bean Manager Examples -->

<bean id="accountOne" class="org.apache.aries.samples.Account">
<argument value="1"/>
<property name="description" value="#1 account"/>
</bean>

<bean id="accountTwo" class="org.apache.aries.samples.StaticAccountFactory"
factory-method="createAccount">
<argument value="2"/>
<property name="description" value="#2 account"/>
</bean>

<bean id="accountFactory" class="org.apache.aries.samples.AccountFactory">
<argument value="account factory"/>
</bean>

<bean id="accountThree"
factory-ref="accountFactory"
factory-method="createAccount">
<argument value="3"/>
<property name="description" value="#3 account"/>
</bean>

<bean id="prototypeAccount" class="org.apache.aries.samples.Account"
scope="prototype">
<argument value="4"/>
</bean>

<bean id="singletonAccount" class="org.apache.aries.samples.Account"
scope="singleton">
<argument value="5"/>
</bean>

<bean id="accountFour" class="org.apache.aries.samples.Account"
init-method="init" destroy-method="destroy">
<argument value="6"/>
<property name="description" value="#6 account"/>
</bean>


<!-- Service Manager Examples -->

<bean id="myAccount" class="org.apache.aries.samples.MyAccount">
<argument value="7"/>
<property name="description" value="MyAccount"/>
</bean>

<service id="serviceOne" ref="myAccount" interface="java.io.Serializable"/>

<service id="serviceTwo" ref="myAccount">
<interfaces>
<value>java.io.Serializable</value>
</interfaces>
</service>

<service id="serviceThree" ref="myAccount" auto-export="all-classes"/>

<service id="serviceFour" ref="myAccount" auto-export="all-classes">
<service-properties>
<entry key="mode" value="shared"/>
<entry key="active">
<value type="java.lang.Boolean">true</value>
</entry>
</service-properties>
</service>

<service id="serviceFive" ref="myAccount" auto-export="all-classes" ranking="3"/>

<service id="serviceSix" ref="myAccount" auto-export="all-classes">
<registration-listener
registration-method="register" unregistration-method="unregister">
<bean class="org.apache.aries.samples.RegistrationListener"/>
</registration-listener>
</service>


<!-- Service Reference Manager Examples -->

<reference-list id="serviceReferenceListTwo" interface="java.io.Serializable"
availability="optional">
<reference-listener
bind-method="bind" unbind-method="unbind">
<bean class="org.apache.aries.samples.ReferenceListener"/>
</reference-listener>
</reference-list>


<!-- Environmental Manager Example -->

<bean id="accountManagerOne" class="org.apache.aries.samples.AccountManager">
<property name="managerBundle" ref="blueprintBundle"/>
</bean>


<!-- Object Values Examples -->

<bean id="accountManagerTwo" class="org.apache.aries.samples.AccountManager">
<property name="managedAccount">
<ref component-id="accountOne"/>
</property>
</bean>

<bean id="accountManagerThree" class="org.apache.aries.samples.AccountManager">
<property name="managedAccount">
<bean class="org.apache.aries.samples.Account">
<argument value="10"/>
<property name="description" value="Inlined Account"/>
</bean>
</property>
</bean>

<bean id="accountManagerFour" class="org.apache.aries.samples.AccountManager">
<property name="accountNumbers">
<list>
<value>123</value>
<value>456</value>
<value>789</value>
</list>
</property>
</bean>

</blueprint>

可以看出,这个文件与Spring的配置文件非常类似。

Blueprint XML中可以标记beanservicereference-list等元素,用于bean管理、service管理和service引用管理。

  • Bean管理

    通过<bean>标签定义Bean,容器可以创建bean、设置属性。bean的创建可以基于构造函数、静态工厂或工厂方法;属性可以是基本类型,也可以引用其他的bean。可以设置bean的scope为singleton或prototype。

  • Service管理

    bean只能在当前bundle中使用。要跨bundle引用,必须定义服务。服务可以依赖bean或其他服务。

    服务管理用于在OSGi服务注册表中注册服务。容器会根据服务的依赖关系是否满足,自动注册或注销服务。

  • Service引用管理

    通过<reference><reference-list>标签可以引用其他bundle中发布的服务。两个标签分布用于引用单个服务和引用服务列表。

一个bundle可以有一个或多个xml配置,通常位于OSGI-INF/blueprint/目录下,也可以在META-INF/MANIFEST.MF文件中通过
Bundle-Blueprint属性进行指定。

更多关于Blueprint XML配置的内容和例子,可以参考Apache Aries官方的例子,以及developerWorks上的这篇文章

工作原理

Blueprint Container 使用扩展器(extender)模式,监视OSGi框架中的bundle的状态。当新的bundle被激活时,
Blueprint根据该bundle是否有Blueprint XML配置文件判断是否需要容器进行处理。

处理的过程是为该bundle创建一个容器,通过容器解析XML文件,并将组件装配到一起。如果bundle中的服务依赖得到满足,容器还会调用OSGi DS发布服务。

在停止bundle时,也会进行相反的销毁过程。

在Eclipse中运行和调试

可以在前面通过maven手工创建Felix运行环境的基础上,
增加Blueprint需要的bundle:

1
2
3
4
5
6
7
8
9
10
11
12
13
14
15
16
17
18
19
20
21
22
23
24
25
26
27
28
29
30
31
<!-- for aries blueprint -->
<artifactItem>
<groupId>org.apache.aries.blueprint</groupId>
<artifactId>org.apache.aries.blueprint</artifactId>
<version>1.1.0</version>
</artifactItem>
<artifactItem>
<groupId>org.apache.aries.proxy</groupId>
<artifactId>org.apache.aries.proxy</artifactId>
<version>1.0.1</version>
</artifactItem>
<artifactItem>
<groupId>org.apache.aries</groupId>
<artifactId>org.apache.aries.util</artifactId>
<version>1.1.0</version>
</artifactItem>
<artifactItem>
<groupId>org.apache.felix</groupId>
<artifactId>org.apache.felix.configadmin</artifactId>
<version>1.2.4</version>
</artifactItem>
<artifactItem>
<groupId>org.ops4j.pax.logging</groupId>
<artifactId>pax-logging-api</artifactId>
<version>1.4</version>
</artifactItem>
<artifactItem>
<groupId>org.ops4j.pax.logging</groupId>
<artifactId>pax-logging-service</artifactId>
<version>1.4</version>
</artifactItem>

使用Apache Felix Karaf

自己搭建的Felix+Blueprint环境功能很有限,比如缺失了很多必要的基础组件和管理功能。更好的选择是使用Apache Felix Karaf

Karaf在Felix和Blueprint的基础上,还增加了一些插件,以提供认证和登录、热部署、动态配置、控制台以及一些管理功能。

更贴心的是,Karaf还提供了Eclipse插件:Eclipse Integration for Karaf (EIK),从而可以:

  • Custom Eclipse perspective for Apache Karaf development:
    • places valuable Karaf runtime information in one location
  • Apache Karaf installation management in your workspace:
    • Karaf installations are managed as workspace projects giving the developer visibility in to the runtime
    • each Karaf installation is automatically synchronized with your workspace, including additional bundles, configuration files
  • Run and debug Karaf installations with a single Eclipse Launcher:
    • the launch configuration allows developers to fine tune how Karaf will launch
  • Automatic deployment of workspace plugin projects:
    • create plugin-projects and have them deployed automatically
  • Advanced instrumentation of the running Karaf instance:
    • watch bundles deploy in real time and examine the OSGi service registry from within the Eclipse IDE
  • Access Eclipse platform IDE plugins from within a running Karaf instance:
    • all Eclipse plugins are presented as an OBR

Tycho与Maven-Bundle-Plugin的对比

Maven与OSGi天生就是冤家:Maven通过pom.xml描述一个产物的全部,而OSGi将这项工作交给了MANIFEST.MF

如果仅仅是一些定义信息还好说,但是Maven和OSGi都希望能够描述产物的依赖关系,在使用Maven开发OSGi bundle的时候,就导致了一个问题:

依赖关系到底是在pom.xml中描述,还是在MANIFEST.MF中描述?

前面提到的Tycho的思路是由MANIFEST.MF自行管理bundle的依赖关系,pom.xml只记录使用maven进行构建时需要的信息,比如maven工程的父子关系、打包时需要的bundle仓库及要发布的目标平台等。

Tycho的这种机制对Eclipse IDE比较友好,在开发期间完全使用IDE的机制进行开发和调试,只有在打包部署时才依赖maven。

Apache Felix Maven-Bundle-Plugin
则使用另一套机制:使用Maven-Bundle-Plugin,在开发时可以没有MANIFEST.MF文件!Maven-Bundle-Plugin在pom.xml中复制了一套MANIFEST.MF的元数据,完全可以通过pom.xml文件中的定义生成出完整的MANIFEST.MF文件。

Maven-Bundle-Plugin的这种机制使得工程完全的”maven化”,更适合传统非OSGi开发人员的使用习惯。但是无法很好的利用IDE的开发和调试功能,比如,你可能需要自己搭建一个运行环境从IDE中调用。

两种方式可谓各有千秋。但是Tycho明显基于Equniox和Eclipse,比如,Tycho可以配置Eclipse p2站点作为bundle库。如果要使用Tycho开发和调试Felix,需要搭建一个Eclipse风格的p2站点,将Felix runtime和需要的各种bundle都放到该站点中并发布,然后在Tycho中引用该站点。更详细的说明可以参考这里

而Felix Maven-Bundle-Plugin对于各种OSGi runtime的支持是相同的,由于完全基于maven,使用任何IDE开发bundle的效果都差不多。通常,Felix系的平台,如Karaf、Geronimo、Camel、ServiceMix、Fuse等,其例子都是使用Maven-Bundle-Plugin构建的。

由于前文已经说明了如何用Tycho开发OSGi,下面只给出使用Maven-Bundle-Plugin的例子。

Maven-Bundle-Plugin的pom例子

1
2
3
4
5
6
7
8
9
10
11
12
13
14
15
16
17
18
19
20
21
22
23
24
25
26
27
28
29
30
31
32
33
34
35
36
37
38
39
40
41
42
43
44
45
46
47
48
49
50
51
52
53
54
55
<project xmlns="http://maven.apache.org/POM/4.0.0" xmlns:xsi="http://www.w3.org/2001/XMLSchema-instance"
xsi:schemaLocation="http://maven.apache.org/POM/4.0.0 http://maven.apache.org/xsd/maven-4.0.0.xsd">
<modelVersion>4.0.0</modelVersion>
<groupId>thinkinside.demo.osgi</groupId>
<artifactId>simple-bundle</artifactId>
<version>0.0.1-SNAPSHOT</version>


<build>
<plugins>
<plugin>
<groupId>org.apache.felix</groupId>
<artifactId>maven-bundle-plugin</artifactId>
<executions>
<execution>
<id>generate-resources</id>
<goals>
<goal>manifest</goal>
</goals>

<configuration>
<instructions>
<Bundle-Name>${project.name}</Bundle-Name>
<Bundle-SymbolicName>${project.artifactId}</Bundle-SymbolicName>
<Bundle-Activator>test.bundle.internal.Activator</Bundle-Activator>
<Export-Package>***</Export-Package>
<Import-Package>***</Import-Package>
<Private-Package>***</Private-Package>
</instructions>
</configuration>
</execution>
</executions>
</plugin>

<plugin>
<groupId>org.apache.maven.plugins</groupId>
<artifactId>maven-jar-plugin</artifactId>
<version>2.3.1</version>
<configuration>
<archive>
<manifestFile>${project.build.outputDirectory}/META-INF/MANIFEST.MF</manifestFile>
</archive>
</configuration>
</plugin>
</plugins>
</build>

<dependencies>
<dependency>
<groupId>org.apache.felix</groupId>
<artifactId>org.osgi.core</artifactId>
<version>1.4.0</version>
</dependency>
</dependencies>
</project>

使用Maven-Bundle-Plugin构建bundle,就是构建一个简单的jar。不同之处在于:要通过pom.xml中的信息生成符合OSGi要求的MANIFEST.MF文件并打包到jar中。这通过两个插件来完成:

  • org.apache.felix:maven-bundle-plugin

    在项目生命周期的”generate-resources”阶段,根据<instructions>标签内定义的信息生成MANIFEST.MF文件。这里可以配置OSGi所需要的全部元数据。

  • org.apache.maven.plugins:maven-jar-plugin

    配置其在打包是使用前面生成的MANIFEST.MF文件

由于OSGi bundle通常会使用OSGi API,这里添加了org.apache.felix:org.osgi.core的依赖。当然也可以换成其他的OSGi运行时,比如Equinox。

此时,使用mvn package生成的jar包中,MANIFEST.MF文件内已经添加了配置好的bundle信息。

当然,使用maven-bundle-plugin的目标(Goals)
可以进行更细致的控制。

在Eclipse中运行和调试

本来,传说中的Pax Cursor可以在Eclipse中基于各种OSGi runtime运行和调试bundle,但是天朝的网络中似乎不存在ops4j.org这个域名。

好在我们可用一个Java Project的方式建立起Felix的环境,通过Eclipse对bundle进行运行和调试。
由于这里有非常详细的说明,故不再赘述。

其实,我们还可以基于maven构建,而不是使用Java Project的方式。使用maven的好处是这种方法可以用于任何支持maven的IDE。

Felix runtime的主要内容包括:

其中:

  • bin/felix.jar 启动的jar, MainClass是org.apache.felix.main.Main
  • bundle/ 存放可用的bundle,Felix runtime中内置了4个必需的bundle
  • conf/conf.properties 启动配置。类似于Eclipse的configuration/config.ini。Felix配置项可以参考官方网站中的内容

知道了Felix runtime的构成,就可以用maven构建出相同的结构,并插入到项目周期的适当位置。pom如下:

1
2
3
4
5
6
7
8
9
10
11
12
13
14
15
16
17
18
19
20
21
22
23
24
25
26
27
28
29
30
31
32
33
34
35
36
37
38
39
40
41
42
43
44
45
46
47
48
49
50
51
52
53
54
55
56
57
58
59
60
61
62
63
64
65
66
67
68
69
70
71
72
73
74
75
76
77
78
79
80
81
82
83
84
<project xmlns="http://maven.apache.org/POM/4.0.0" xmlns:xsi="http://www.w3.org/2001/XMLSchema-instance"
xsi:schemaLocation="http://maven.apache.org/POM/4.0.0 http://maven.apache.org/xsd/maven-4.0.0.xsd">
<modelVersion>4.0.0</modelVersion>
<groupId>thinkinside.demo.fuse</groupId>
<artifactId>felix-launcher</artifactId>
<version>0.0.1-SNAPSHOT</version>
<name>Felix Launcher</name>
<properties>
<felix.bundlerepository.version>1.6.4</felix.bundlerepository.version>
<felix.gogo.version>0.10.0</felix.gogo.version>
<felix.framework.version>4.2.1</felix.framework.version>
</properties>

<build>
<plugins>
<plugin>
<artifactId>maven-clean-plugin</artifactId>
<version>2.4.1</version>
<configuration>
<filesets>
<fileset>
<directory>bundle</directory>
</fileset>
</filesets>
</configuration>
</plugin>

<plugin>
<groupId>org.apache.maven.plugins</groupId>
<artifactId>maven-dependency-plugin</artifactId>
<version>2.2</version>
<executions>
<execution>
<id>copy</id>
<phase>generate-resources</phase>
<goals>
<goal>copy</goal>
</goals>
<configuration>
<artifactItems>
<artifactItem>
<groupId>org.apache.felix</groupId>
<artifactId>org.apache.felix.gogo.command</artifactId>
<version>${felix.gogo.version}</version>
</artifactItem>
<artifactItem>
<groupId>org.apache.felix</groupId>
<artifactId>org.apache.felix.gogo.runtime</artifactId>
<version>${felix.gogo.version}</version>
</artifactItem>
<artifactItem>
<groupId>org.apache.felix</groupId>
<artifactId>org.apache.felix.gogo.shell</artifactId>
<version>${felix.gogo.version}</version>
</artifactItem>
<artifactItem>
<groupId>org.osgi</groupId>
<artifactId>org.osgi.compendium</artifactId>
<version>4.2.0</version>
</artifactItem>
</artifactItems>
<outputDirectory>bundle</outputDirectory>
</configuration>
</execution>
</executions>
</plugin>
</plugins>

</build>

<dependencies>
<dependency>
<groupId>org.apache.felix</groupId>
<artifactId>org.apache.felix.main</artifactId>
<version>${felix.framework.version}</version>
</dependency>

<dependency>
<groupId>org.ops4j.pax.url</groupId>
<artifactId>pax-url-assembly</artifactId>
<version>1.6.0</version>
</dependency>
</dependencies>
</project>

该pom在标准的生命周期中增加了两项工作:

  • generate-resources阶段,创建bundle文件夹,复制必需的4个bundle
  • clean阶段,清除bundle文件夹

最后,还需要一个配置文件。在工程目录建立/conf/config.properties文件,并进行基本配置:

1
2
3
4
felix.auto.deploy.action=install,start
felix.log.level=1

org.osgi.framework.storage.clean=onFirstInit

配置完成了,先执行mvn compile生成需要的资源。此时使用命令mvn exec:java -Dexec.mainClass="org.apache.felix.main.Main"即可以启动Felix runtime:

在Eclipse中,将这个工程作为Java Application运行,选择org.apache.felix.main.Main作为Main Class,就可以进行运行和调试。

JBoss Fuse:企业级ESB

我没写错,就是“企业级ESB”。尽管“ESB”是“企业服务总线“的缩写,但确实有些”所谓的ESB“并不具备企业级特性。

比如MuleCE,甚至MuleEE。

JBoss Fuse具备了一个企业级平台所需要的特性:

除了实现基本的ESB功能外,JBoss Fuse还提供了IDE、管理和监控、集群支持等特性。这是一个产品进入企业级领域不可或缺的特性。

与Oracle Fusion、Mule ESB、Talend Unified Platform、WSO2 Platform等一样,JBoss Fuse也是一款商业的ESB产品。

JBoss Fuse由大量成熟的开源软件组合而成,包括但不仅限于:

  • JBoss Fuse
    • Apache ServiceMix
      • Apache CXF
      • Apache Camel
      • Apache ActiveMQ
      • SpringDM
      • Karaf
      • BluePrint
    • Fuse Fabric
    • HawtIO

可以说,Fuse使用的这些开源软件是历史的选择,经过长达8年的时间,融合了最广泛使用的同类产品,最终成为一个整体的ESB平台:

Apache ServiceMix

尽管JBoss Fuse官方有意无意的避免提及ServiceMix,比如这张图:

和这段文字:

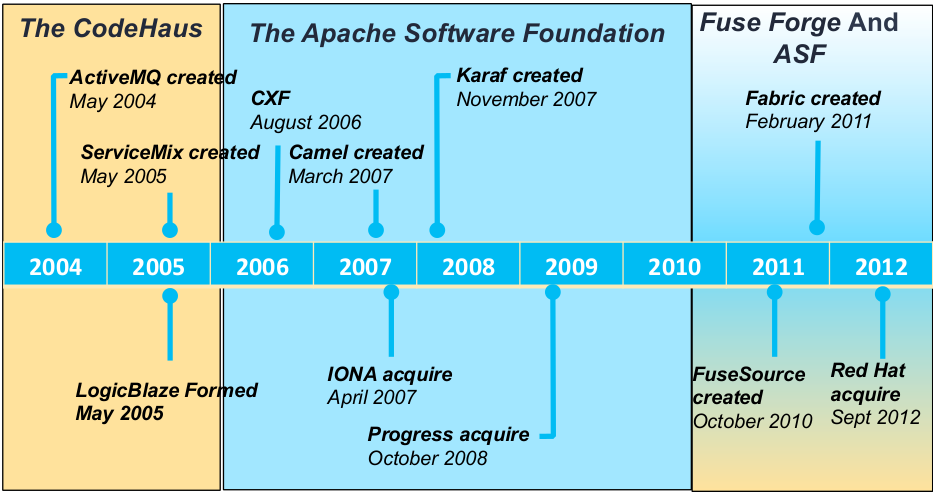
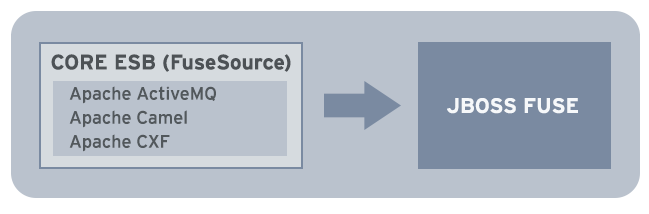
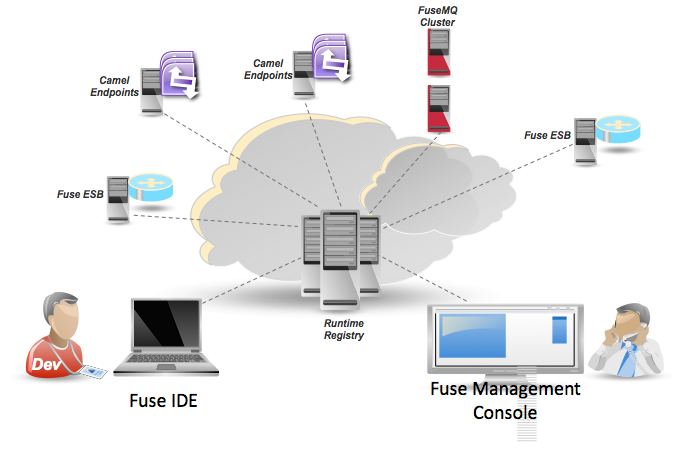
"JBoss Fuse combines core Enterprise Service Bus capabilities (based on Apache Camel, Apache CXF, Apache ActiveMQ), Apache Karaf and Fuse Fabric in a single integrated distribution."

但是Apache ServiceMix确实是Fuse中最核心的组成部分,实现了ESB的核心功能。

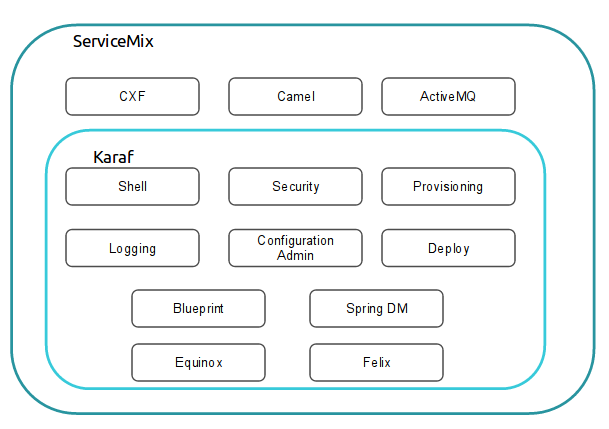
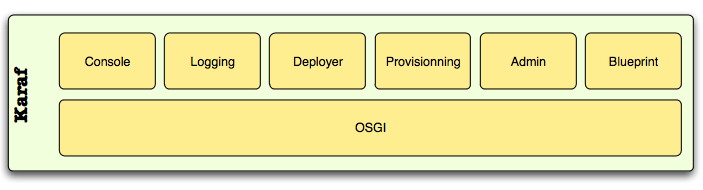
”Apache ServiceMix is a flexible, open-source integration container that unifies the features and functionality of Apache ActiveMQ, Camel, CXF, ODE, Karaf into a powerful runtime platform you can use to build your own integrations solutions. It provides a complete, enterprise ready ESB exclusively powered by OSGi.“

ServiceMix是一个开源的ESB,使用Apache CXF发布服务,使用Apache Camel实现路由,使用Apache ActiveMQ实现可靠的消息传输。
ServiceMix使用OSGi将上述这些组件整合到一起,并使用Apache Karaf作为OSGi容器。

Apache CXF

Apache CXF已经成了Java发布WebService的事实标准。

CXF 继承了 Celtix 和 XFire 两大开源项目的精华,提供了对 JAX-WS 和 JAX-RS 全面的支持,并且提供了多种 Binding 、DataBinding、Transport 以及各种 Format 的支持,并且可以根据实际项目的需要,采用代码优先(Code First)或者 WSDL 优先(WSDL First)来轻松地实现 Web Services 的发布和使用。

关于使用Fuse发布Web Service,可以参考:《JBoss Fuse: 开发和部署Web Service》

Apache Camel

Apache Camel基于规则路由和中介引擎实现了企业集成模式(EIP,Enterprise Integration Patterns)
,可以基于POJO定义路由配置和中介的规则,不需要大量的XML配置文件。

Camel基于OSGi框架并使用依赖注入。支持Blueprint或Spring DM作为OSGi的依赖注入的框架。

这里有关于Camel的介绍:《Camel的核心概念》

Apache Aries Blueprint

有一些项目致力于将OSGi引入到企业级应用环境,比如Apache AriesEclipse Gemini,基于OSGi架构,实现企业应用所需的事务管理(JTA)、命名服务(JNDI)、持久化标准(JPA)、
管理模型(JMX)等功能。

其中,为了解决企业级应用开发所习惯的依赖注入,这些项目都实现了OSGi R4.2中规定了Blueprint标准。
也就是说,Blueprint是OSGi中的依赖注入规范
Apache Aries项目中对应的产品就是Aries Blueprint

Spring DM

Spring DM(Spring Dynamic Modules),其目标是使得用Spring开发的应用能够在OSGi容器中运行。Spring DM设计的Spring应用与OSGi平台的关系如下图:

将应用模块封装为OSGi bundle时,需要将该应用的Spring装配文件放置到jar包的META-INF/spring/目录下。
该装配文件除了传统的bean配置外,还可以配置osgi:service,以引用或发布OSGi服务。

也可以在MANIFEST.MF中用Spring-Context参数进行指定。比如:

1
2
3
4
5
Spring-Context: config/applicationContext.xml, config/beans-security.xml
Spring-Context: *;create-asynchronously=false
Spring-Context: config/osgi-*.xml;wait-for-dependencies:=false
Spring-Context: *;timeout:=60
Spring-Context: *;publish-context:=false

Spring DM提供了spring-osgi-annotation,spring-osgi-core,spring-osgi-io,spring-osgi-extender等bundle,可以部署到OSGi容器中。

其中,spring-osgi-extender会创建OSGi容器中的“Spring Application Context”,并监听OSGi容器的事件。当有新的bundle部署时,spring-osgi-extender会检查该bundle是否包含Spring-Context或者META-INF/spring/中的装配文件。如果有,则将其视为“spring bundle”,会根据装配文件进行bean的组装,当需要引用或发布OSGi服务时,spring-osgi-extender会调用OSGi框架中相应的方法。
最后,将bean加入到Application Context中。

Spring DM与Blueprint的功能非常类似,实际上,先有Spring DM,然后才有Blueprint。尽管Spring DM项目已经停止了,但是
为了适应“遗留系统”,在ServiceMix中依然集成了SpringDM。

Apache ActiveMQ

Apache ActiveMQ是老牌的开源MQ软件,支持JMS 1.1和2.0,支持集群和容错(Fault Tolerance),可以实现发布/定义、点对点、分组、流等消息传递模式,提供了高可用(HA)和负载均衡机制。

本来差点被RabbitMQ强了位置,但是ActiveMQ迅速支持了AMQP 1.0,估计其地位还会稳固相当一段时间。

Apache Karaf

Apache Karaf是一个轻量级的OSGi容器,使用Apache Felix作为OSGi运行时,提供控制台、日志、热部署、依赖注入等功能。

虽然Equinox与Felix可以单独使用,但Karaf旨在结合这两个框架出色的OSGi功能,并且保证其开箱即用。
比如说,它包含了一个可配置的日志系统(基于Log4J,但针对众多通用的日志系统进行了包装)、通过SSH实现的远程访问、通过ConfigAdmin进行配置以及内建的JAAS支持。不仅如此,Karaf还安装了Pax URL的MVN协议,这样就可以从Maven中央仓库(在必要的情况下会自动将其包装为bundle)安装bundle了。

此外,Karaf还提出了特性的概念,所谓特性就是bundle的集合,能以组的形式安装到运行着的OSGi运行时当中。特性包含了对obr、jetty以及spring的支持,做到了开箱即用。这样,如果需要安装多个bundle,但这些bundle之间并没有严格的运行期依赖,那么这种支持就可以大大简化这种情况。在迁移到Apache Felix项目中前Karaf是ServiceMix Kernel,并且最终成为了Apache的顶级项目。Karaf还加入到了其他框架当中,如Eclipse Virgo和EclipseRT packages,提供了预先配置的框架与好用的OSGi bundle,这样在上手使用OSGi运行时时就会比以往更加简单。

Karaf已经被诸多Apache项目作为基础容器,比如Apache Geronimo, Apache ServiceMix, Fuse ESB等。

Felix和Equinox

OSGi运行时(runtime)的几个实现中,的推广度程度不高,SpringDM已经被放弃

Equinox跟随Eclipse大放光彩之后,却很难进入企业级应用领域。
Felix无论是从自身表现还是推广程度来看,可以说前景非常良好。

Fuse Fabric

由于Fuse基于大量的开源项目,要实现配置管理、集群以及部署就变得非常复杂。

Fuse Fabric是一个开源的集成平台(iPaaS),能够简化部署和变更管理等工作。

Fabirc基于Apache ZooKeeper建立了一个注册中心,利用git的分布式版本控制管理部署描述符(profiles),对各个容器进行管理,包括
变更管理、滚动升级以及版本回退。

Fuse Fabric支持对Fuse ESB, Fuse MQ, Apache ActiveMQ, Camel, CXF, Karaf, ServiceMix等软件的管理。

Apache ZooKeeper

Apache Zookeeper,是Apache Hadoop 的一个子项目,它主要是用来解决分布式应用中经常遇到的一些数据管理问题,如:统一命名服务、状态同步服务、集群管理、分布式应用配置项的管理等。通常,ZoopKeeper被用于配置文件的管理、集群管理、同步锁、Leader 选举、队列管理等。

HawtIO

Hawt IO 是一个基于HTML5的Web控制台,可以通过配置和使用大量的插件管理基于Java的应用或平台。Hawt IO自带的插件包括基于git的Dashboard, Wiki, 日志, 健康状态, JMX, OSGi, Apache ActiveMQ, Apache Camel, Apache OpenEJB, Apache Tomcat, Jetty, JBoss, Fuse Fabric等,也可以很容易开发自己的插件。

新版本的ActiveMQ、Fuse等都使用HawtIO作为管理控制台。

HawtIO的目标是:”为每一个JVM提供一个基于Web的控制台“。

标准和规范

OSGi

[OSGi(Open Services Gateway initiative)](http://www.osgi.org/Main/HomePage是一个标准,
致力于为Java提供一个模块化的底层环境,以及一系列通用的服务(Service)。

和普通的JVM程序相比,OSGi的程序天生拥有动态模块的特点,不同的模块(OSGi里称之为Bundle)有着独立的生命周期,可以独立进行安装、启动、停止、卸载的操作,模块间的依赖性管理也由OSGi提供。

OSGi非常适合需要进行Plugin管理的项目,一个典型的成功案例就是Eclipse和它众多的Plugin。OSGi标准还规范了一系列我们常间的操作,日志、配置文件、事件队列、Web开发、JPA&JDBC等等,大部分部署OSGi标准的框架都提供了这些服务。

JAX‐WS, JAXB, SAX

JSR 224: JAX-WS (Java API for XML-Based Web Services),一组XML web services的JAVA API规范,允许开发者选择RPC-oriented或者message-oriented 来实现自己的web services。

JAX-WS使用JSR 222: JAXB(Java Architecture for XML Binding)作为绑定的规范,使用JSR 173: SAX(Streaming API for XML)作为XML解析的规范。Java EE 6 引入了对 JAX-WS 的支持。

JAX‐RS

JSR 311: JAX-RS(The Java API for RESTful Web Services),定义一个统一的规范,使得 Java 程序员可以使用一套固定的接口来开发 REST 应用,避免了依赖于第三方框架。同时,JAX-RS 使用 POJO 编程模型和基于标注的配置,并集成了 JAXB,从而可以有效缩短 REST 应用的开发周期。
Java EE 6 引入了对 JAX‐RS 的支持。

Blueprint

Blueprint提供了一个针对OSGi的依赖注入的框架,通过XML文件定义和描述各种元件组的装配。

OSGi R4.2对Blueprint进行了标准化。

目前主要有Apache Aries和Eclipse Gemini两个实现。

EIP

EIP(Enterprise Integration Patterns),企业整合模式。

JBI(TODO)

JSR 208: JBI(Java Business Integration)是一种SOA的组件整合标准模型。

SOA在Java领域有两套标准:

  • 商业的SCA和SDO标准,由IBM和BEA等公司推出。其中SCA实现了业务组件和传输协议的分离,可以处理各种平台组件的集成;SDO可以的自由读取各种不同数据源的数据。
  • JSR组织的JBI标准,由SUN最早推出,但是没有得到BEA和IBM的承认。JBI只关注Java组件的集成。

JBI容器由三部分组成:

  • BC(Binding Components)

    绑定组件用于接收各种不同传输协议的请求。可以细分为接收BC和发送BC:接收BC主要负责发送请求和接收响应,发送BC主要用来调用外部的服务。

  • SE(Service Engines)

    服务引擎处理JBI容器内部的消息。JBI容器通常在接收到消息后,需要对请求的消息做一些“处理”,然后再调用外部服务的提供者。根据功能的不同,将SE组件分为以下三种类型:

    • Transform SE:处理各种传输协议和格式变化
    • BPEL SE:将Web Service进行流程编排
    • Rules SE:按照规则将各种服务进行集成
  • NMB(Normalized Message Router)

    规格化消息路由器是JBI内部消息系统的核心,所有的组建之间不能交换消息,只能通过NMR来传递。

目标

R学习笔记中,展示了这样一张图表:

现在需要在Eclipse e4应用中实现这样的图表。

SWT图表组件的选择

在RCP/JFace/SWT中,可以选择的图表组件包括:

  • Eclipse BIRT

    Eclipse BIRT是Eclipse平台下的报表框架。其中的图表组件可以单独使用。
    由于BIRT依赖于GEF、EMF等Eclipse插件,所以非常重,不适合简单轻量的应用。

  • SWT Chart

    从名字就可以看出,SWT Chart是专为SWT环境开发的报表组件。设计很清晰,使用起来也方便。但是目前支持的图表类型比较少。

  • JFreeChart

    JFreeChart是Java世界的老牌图表组件,其强大无以言表。JFreeChart支持AWT、Swing等
    GUI环境,也可以生成图片在Web环境中使用。后来又增加了对SWT环境的支持,从此不再需要SWT_AWT的桥接方式。

综上所述,这里选择JFreeChart作为绘图组件。

获取股票数据

由于需要的数据量比较大,不能再使用前面的模拟数据方法了。这里使用雅虎财经的数据。

雅虎财经提供了查询股票历史数据的接口:

1
http://table.finance.yahoo.com/table.csv?ignore=.csv&....

参数包括:

  • s: 股票代码/名称。对于国内的股票,使用类似000001.ss的编码
  • a、b、c: 开始时间的月、日、年
  • d、e、f: 结束时间的月、日、年
  • g:时间周期,分别为d:日, w:周,m:月, v:dividends only

其中,月份是从0开始。比如,9月数据写为08。

本文中使用2013年上证综合指数的日线数据:

1
http://table.finance.yahoo.com/table.csv?ignore=.csv&s=000001.ss&a=00&b=01&c=2013&d=11&e=31&f=2013&g=d

获取到的CSV文件包含的数据列为Date,Open,High,Low,Close,Volume,Adj Close,其中Date的格式为yyyy-MM-dd。数据按照日期倒序排列。

处理代码如下:

1
2
3
4
5
6
7
8
9
10
11
12
13
14
15
16
17
18
19
20
21
22
23
24
25
26
27
28
29
30
31
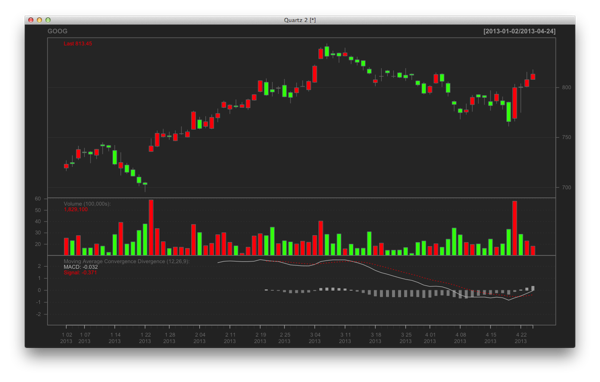
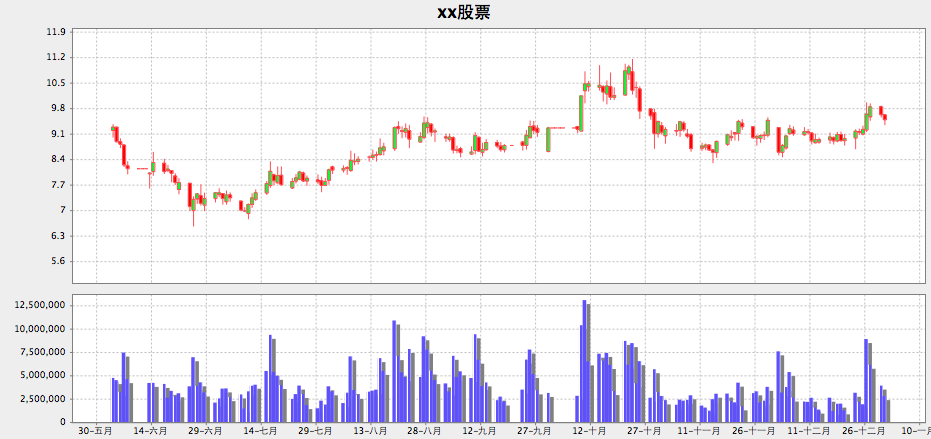
OHLCSeries ohlcSeries = new OHLCSeries("");
TimeSeries volumeSeries =new TimeSeries("");

try{
URL url = new URL("http://table.finance.yahoo.com/table.csv?ignore=.csv&s=000001.ss&a=00&b=01&c=2013&d=11&e=31&f=2013&g=d");
InputStream is = url.openStream();
InputStreamReader reader = new InputStreamReader(is,"UTF-8");

BufferedReader buffer = new BufferedReader(reader);


String newLine = buffer.readLine();// 标题行


while ((newLine = buffer.readLine()) != null) {
String item[] = newLine.trim().split(",");
Date date = df.parse(item[0]);
float open = Float.valueOf(item[1]);
float high = Float.valueOf(item[2]);
float low = Float.valueOf(item[3]);
float close = Float.valueOf(item[4]);
float volume = Float.valueOf(item[5]);
float adj_close = Float.valueOf(item[6]);

ohlcSeries.add(new Day(date), open,high,low,close);
volumeSeries.add(new Day(date),volume);
}

}catch(Exception e){
e.printStackTrace();
}

联合图表

目标中的图表是一种联合图表(Combined Chart):多个图表共用横坐标或纵坐标。JFreeChart中提供了CombinedDomainXYPlotCombinedRangeXYPlot,分别用于联合横坐标和联合纵坐标的图表。

由于各种图表类型都有可能组成联合图表,JFreeChart没有在ChartFactory中提供工厂方法进行创建,
只能按照JFreeChart中的图表模型进行手工创建。下面是例子:

1
2
3
4
5
6
7
8
9
10
11
12
13
14
15
16
17
18
19
20
21
22
23
24
25
26
27
28
29
30
31
//创建横坐标轴,作为联合坐标
DateAxis timeAxis = new DateAxis();

//创建两个纵坐标,用于上下两个Plot
NumberAxis ohlcAxis = new NumberAxis();
NumberAxis volumeAxis = new NumberAxis();

//创建两个Plot对应的Renderer
CandlestickRenderer ohlcRenderer = new CandlestickRenderer();
XYBarRenderer volumeRenderer = new XYBarRenderer();

//创建K线图的Plot,使用“数据”一节中的ohlcSeries
////其中横坐标设为"null",以使用联合横坐标
OHLCSeriesCollection ohlcDataset = new OHLCSeriesCollection();
ohlcDataset.addSeries(ohlcSeries);
XYPlot ohlcPlot = new XYPlot(ohlcDataset,timeAxis,ohlcAxis,ohlcRenderer);

//创建成交量柱状图的Plot,使用“数据”一节中的volumeSeries
//其中横坐标设为"null",以使用联合横坐标
TimeSeriesCollection volumeDataset = new TimeSeriesCollection();
volumeDataset.addSeries(timeSeries);
XYPlot volumePlot=new XYPlot(volumeDataset,null,volumeAxis,volumeRenderer;

//创建联合图表
CombinedDomainXYPlot combineddomainxyplot = new CombinedDomainXYPlot(timeAxis());

//上下两个图表占据的高度比例为2:1,间隔为10
combineddomainxyplot.add(ohlcPlot, 2);
combineddomainxyplot.add(volumePlot, 1);
combineddomainxyplot.setGap(10);
JFreeChart chart = new JFreeChart("xx股票", JFreeChart.DEFAULT_TITLE_FONT, combineddomainxyplot, false);

创建的图表如下所示:

设置样式

上面的图表默认样式与国内的习惯不大一样。不过JFreeChart提供了丰富的API进行样式的设置。下面对样式进行简单调整(目前对SWT的支持不够完全。比如,颜色值仍需要使用AWT的Color类):

1
2
3
4
5
6
7
8
9
10
11
12
13
14
15
16
17
18
19
20
//图表
chart.setBackgroundPaint(Color.BLACK);
chart.getTitle().setPaint(Color.WHITE);
chart.setBorderVisible(false);

//Plot
combineddomainxyplot.setBackgroundPaint(Color.BLACK);
ohlcPlot.setBackgroundPaint(Color.BLACK);
volumePlot.setBackgroundPaint(Color.BLACK);

//渲染
ohlcRenderer.setUpPaint(Color.RED);
ohlcRenderer.setDownPaint(Color.GREEN);

volumeRenderer.setShadowVisible(false);

//坐标轴
timeAxis.setTickLabelPaint(Color.GRAY);
ohlcAxis.setTickLabelPaint(Color.GRAY);
volumeAxis.setTickLabelPaint(Color.GRAY);

调整后的图表如下所示:

去除非交易时段

前面的例子中,K线是不连续的,因为会有非交易日的存在。如果是小时、分钟级别的K线图,该问题会更加明显。

要去除非交易时段,使得K线连续,大体有两个思路:

  • 实现一个自定义的DateAxis,根据数据的序号产生坐标,根据实际时间产生标签
  • 实现一个Timeline,并设置给DateAxis
  • 更改Renderer

看起来方法1更容易,但由于没有相关的文档,需要自己分析DateAxis的代码,类似一种“Hack”的模式,很难保证向后兼容;
方法2是官方指定的方法,可行性更高,但是要同时支持日线、小时线、分钟/5分钟线,实现起来有点难度。
此外,Timeline的接口说明读起来有些费解;方法3需要改变数据源(Dataset),使用序号作为数据,设置Renderer的ItemLabelGenerator,根据序号产生时间格式的坐标标签。

这里采用方法3,实例代码如下:

1
//TODO

修正高度和宽度(TODO)

  • 固定每根K线的宽度,根据图表宽度决定显示多少根K线

  • 使用“时间窗口”作为数据

横向滚动和实时曲线(TODO)

e4开始,可以不使用代码或xml进行服务注册和寻找,而使用依赖注入进行装配

MANIFEST.MF

为了管理一组Java类和资源,通常我们会将其打包为JAR(Java Archive File,java存档文件),该文件以ZIP格式进行打包。
在JAR文件中,会包含一个META-INF/MANIFEST.MF文件,作为该JAR包的清单文件,设置执行入口类和支持库的路径等信息。
主要内容包括:

  • Manifest-Version
  • Class-Path
  • Created-By
  • Main-Class

OSGi bundle

OSGi的目标是实现Java应用的模块化,其目标是:

  • 将程序封装成一个个的模块(在OSGi中叫做bundle)
  • 模块向外只暴露特定的接口,内部实现对外不可见
  • OSGi容器管理模块的接口,包括服务发布、寻找和版本管理等
  • OSGi容器管理模块的生命周期,比如启动、停止、热插拔等

OSGi将每个模块打包为一个JAR文件。为了实现上述目标,
OSGi规范利用了MANIFEST.MF文件,在其中增加了一些bundle的描述信息,比如:

  • Bundle-ManifestVersion
  • Bundle-Name
  • Bundle-SymbolicName
  • Bundle-Version
  • Bundle-ClassPath
  • Bundle-Vendor
  • Bundle-Localization
  • Bundle-RequiredExecutionEnvironment
  • Export-Package
  • Require-Bundle
  • Bundle-Activator
  • Bundle-ActivationPolicy
  • Import-Package

OSGi服务的注册和寻找

OSGi模块中,只有Export-Package中声明的包才可以被其他模块访问。为了避免一个模块对其他模块的直接引用,
通常会实现一个“接口定义”模块和多个“接口实现”模块。通过服务注册和发现的方式进行服务的使用。

OSGi还可以为模块指定一个”激活类(Bundle-Activator)“,
这个类会在模块启动时被执行,通常在这里进行本模块的接口实现(服务)的发布,以及向本模块内的类注入其他模块实现的接口(服务).
比如:

1
2
3
4
5
6
7
8
9
public class MyActivator implements org.osgi.framework.BundleActivator{

@Override
public void start(BundleContext context) throws Exception {
context.registerService(MyService.class.getName(), new MyServiceImpl(), null);
System.out.println(MyService.class.getName() + " has been registred as a service");
}
……
}

这样,其他使用该服务的模块可以寻找服务。通常,也是在”激活类(Bundle-Activator)“中进行:

1
2
3
4
5
6
7
8
9
10
11
public class ClientActivator implements BundleActivator{
public static MyService helloService;

@Override
public void start(BundleContext context) throws Exception {
ServiceReference ref = context.getServiceReference(MyService.class.getName());
MyService service = (MyService) context.getService(ref);
MyClient.setService(service);
}
……
}

Declarative Service

上面通过代码的方式进行服务的注册和寻找,实现起来比较繁琐。为了简化编码,从OSGi4.0版本开始,提出了”Declarative Service“标准,
使用xml文件进行服务发布和引用的描述。

首先,在MANIFEST.MF文件中增加一个新的属性Service-Component,用来指定服务声明文件的路径,比如:

1
Service-Component: OSGI-INF/component.xml

然后编写服务声明配置:

1
2
3
4
5
6
7
<?xml version="1.0" encoding="UTF-8"?>
<scr:component xmlns:scr="http://www.osgi.org/xmlns/scr/v1.1.0" name="myservice">
<implementation class="MyServiceImpl"/>
<service>
<provide interface="MyService"/>
</service>
</component>

该文件中也可以配置服务引用:

1
<reference bind="setMyService" cardinality="1..1" interface="MyService" name="myservice" policy="static" unbind="unsetMyService"/>

可以用如下的代码使用所引用的服务:

1
2
3
4
5
6
7
8
9
10
11
12
// Method will be used by DS to set the service
public synchronized void setMyService(MyService service) {
System.out.println("Service was set. Thank you DS!");
this.service = service;
}

// Method will be used by DS to unset the service
public synchronized void unsetMyService(MyService service) {
System.out.println("Service was unset.");
if (this.service == service) {
this.service = null;
}

e4中的依赖注入

Declarative Service的方式与Spring的服务组装很类似。但是Spring中已经开始使用注解代替繁琐的XML配置

从Eclipse e4开始,已经支持使用JSR330:依赖注入规范实现服务的注入。

在e4增加的服务编程模型中,引入了上下文(context),所有的依赖对象都被上下文管理并通过上下文获取:

在Eclipse e4中,将全局的上下文分成了多个层次:

下层的context可以获取上层context中定义的对象,比如:

e4中,可以使用JSR330中基本的@Inject@Named等注解,用于构造器、方法和属性。同时,e4在org.eclipse.e4.core.di.annotations包中也定义了一些扩展的注解,包括:

  • @Optional:声明一个注入(@Inject)为可选
  • @GroupUpdates:声明一个注入的对象是批量更新的,使用这个注解对于RCP应用的性能有很大好处
  • @Execute
  • @CanExecute
  • @Creatable

下面是e4中依赖注入的一些例子:

1
2
3
4
5
6
7
8
9
10
11
12
13
14
15
16
17
18
19
// Tracks the active part
@Inject
@Optional
public void receiveActivePart(@Named(IServiceConstants.ACTIVE_PART) MPart activePart) {
if (activePart != null) {
System.out.println("Active part changed "
+ activePart.getLabel());
}
}


// tracks the active shell
@Inject
@Optional
public void receiveActiveShell(@Named(IServiceConstants.ACTIVE_SHELL) Shell shell) {
if (shell != null) {
System.out.println("Active shell (Window) changed");
}
}

org.eclipse.e4.core.contexts包中定义的@Active注解可以获取活动(actived)组件。比如:

1
2
3
4
5
6
public class MyOwnClass {
@Inject
void setChildValue(@Optional @Named("key_of_child_value") @Active String value) {
this.childValue = value;
}
}

创建自己的可注入对象

@Creatable

概述

前面提到,e4中可以通过依赖注入进行服务的发布和获取。并且,”在Eclipse e4中,将全局的上下文分成了多个层次“:

e4提供了很多平台级的服务,注册于OSGi context之上的其他各个context层。这些服务提供了开发应用的很多通用的功能。一些常用的服务包括:

展现层MVC的视图、模型、控制器相关的服务,以及逻辑层服务。

  • 视图相关服务

    • EPartService

      访问和修改Part,使用Part模板,切换perspectives,支持Edit方法

    • ESelectionService

      处理GUI界面中的”选中“

    • EMenuService

      Registers a popup menu (MPopupMenu) for an SWT control.

    • org.eclipse.jface.window.IShellProvider

      在SWT环境中访问Shell

    • IThemeEngine

      Allows to switch the styling of the application at runtime.

  • 模型相关服务

    • EModelService

      在运行时访问或更改e4的应用模型

  • 控制器相关服务

    • MDirtyable

      用于标记Part中的内容是否被修改过

    • ECommandService

      访问、创建和更改应用模型中的command对象

    • EHandlerService

      访问、更改或触发(trigger)应用模型中的handler对象

  • 逻辑层相关服务

    • IEventBroker

      提供基于发布、订阅机制的事件处理功能

    • StatusReporter

      Allows you to report Status objects.

    • EContextService

      Activate and deactivate key bindings defined as BindingContext in the application model. The content referred to in this service is the BindingContext and not the IEclipseContext.

    • Logger

      org.eclipse.e4.core.services插件中的Logger提供了日志功能

    • Adapter

      An adapter can adapt an object to the specified type, allowing clients to request domain-specific behavior for an object. It integrates IAdaptable and IAdapterManager

视图相关服务

EPartService

在应用模型中,可以定义PartDescriptors。PartDescriptors可以作为创建Part的模板。

通过EPartService可以访问这些模板,比如:

1
2
3
4
5
6
7
8
9
10
11
12
13
14
15
16
17
18
19
20
21
22
23
24
25
26
27
28
29
30
31
32
33
34
35
36
37
38
39
40
41
42
43
44
45
46
47

@Inject private EPartService partService;

// Showing and hiding parts
detailsTodoPart = partService.findPart("com.example.todo.rcp.parts.tododetails");
partService.hidePart(detailsTodoPart);
……
detailsTodoPart.setVisible(true);
partService.showPart(detailsTodoPart, PartState.VISIBLE);

//Switching perspectives
@Execute
public void execute(MApplication app, EPartService partService,
EModelService modelService) {
MPerspective element =
(MPerspective) modelService.find("secondperspective", app);
// now switch perspective
partService.switchPerspective(element);
}


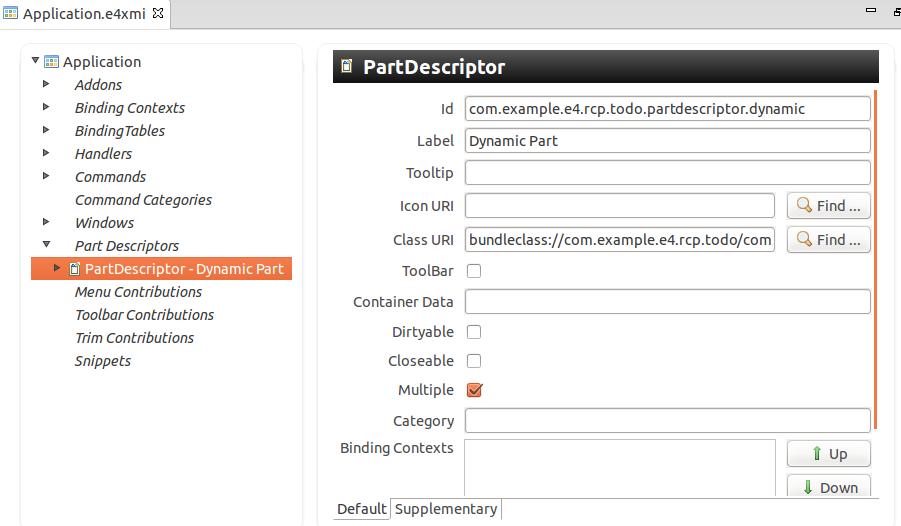
// creating parts dynamically
@Execute
public void execute(EPartService partService) {

// create a new Part based on a PartDescriptor
// in the application model
// assume the ID is used for the PartDescriptor
MPart part = partService
.createPart("com.example.e4.rcp.todo.partdescriptor.fileeditor");
part.setLabel("New Dynamic Part");

// If multiple parts of this type are now allowed
// in the application model,
// then the provided part will be shown
// and returned
partService.showPart(part, PartState.ACTIVATE);
}

//switch perspective
@Execute
public void execute(MApplication app, EPartService partService,
EModelService modelService) {
MPerspective element =
(MPerspective) modelService.find("secondperspective", app);
partService.switchPerspective(element);
}

ESelectionService

e4的应用模型中,MWindow对象可以保持选中的Part。e4在IEclipseContext中注册了ESelectionService,可以设置或获取选中的组件。

使用setSelection()方法可以设置选中状态:

1
2
3
4
5
6
7
8
9
10
11
12
// use field injection for the service
@Inject ESelectionService selectionService;

// viewer is a JFace Viewer
viewer.addSelectionChangedListener(new ISelectionChangedListener() {
@Override
public void selectionChanged(SelectionChangedEvent event) {
IStructuredSelection selection = (IStructuredSelection)
viewer.getSelection();
selectionService.setSelection(selection.getFirstElement());
}
});

使用getSelection(partId)方法可以获取选中的组件,更常用的做法是使用IServiceConstants.ACTIVE_SELECTION作为@Named注解的参数,自动注入选中的组件:

1
2
3
4
5
6
7
@Inject
public void setTodo(@Optional
@Named(IServiceConstants.ACTIVE_SELECTION) Todo todo) {
if (todo != null) {
// do something with the value
}
}

模型相关服务EModelService

使用EModelService可以在运行时访问或更改e4的应用模型,比如增加或删除模型元素。EModelService中一些常用的方法包括:

  • cloneElement()cloneSnippet():克隆元素或模型片段
  • findElements():通过ID、类型、或标签(tags)搜索元素

使用举例:

1
2
3
4
5
6
7
8
9
10
11
12
13
14
15
16
//search by type
private void findParts(MApplication application,
EModelService service) {
List<MPart> parts = service.findElements(application, null,
MPart.class, null);
System.out.println("Found parts(s) : " + parts.size());

}

//Dynamically create a new window
MWindow window = modelService.createModelElement(MWindow.class);
window.setWidth(200);
window.setHeight(300);

// add new Window to the application
application.getChildren().add(window);

控制器相关服务

MDirtyable和@Persist注解

e4中不再区分ViewPart和EditPart,而是统一使用Part。通过MDirtyable可以标记Part中的内容是否被修改过;使用@Persist注解可以标记持久化Part内容的方法。比如:

1
2
3
4
5
6
7
8
9
10
11
12
13
14
15
16
17
18
19
20
21
22
23
24
public class MyEditPart {

@Inject
MDirtyable dirty;

@PostConstruct
public void createControls(Composite parent) {
Button button = new Button(parent, SWT.PUSH);
button.addSelectionListener(new SelectionAdapter() {
@Override
public void widgetSelected(SelectionEvent e) {
dirty.setDirty(true);
}
});
}

@Persist
public void save(MDirtyable dirty, ITodoService todoService) {
// save changes via ITodoService for example
todoService.saveTodo(todo);
// save was successful
dirty.setDirty(false);
}
}

在上面的例子中,看起来@Persist注解没有多大用处。其实,该注解主要用于EPartService的saveAll()方法:

1
2
3
4
5
6
7
public class SaveHandler {

@Execute
void execute(EPartService partService) {
partService.saveAll(false);
}
}

ECommandService和EHandlerService

举例如下:

1
2
3
4
5
6
7
8
9
10
11
12
13
14
15
16
17
Command command = commandService.getCommand("com.example.mycommand");

// check if the command is defined
System.out.println(command.isDefined());

// activate Handler, assume AboutHandler() class exists already
handlerService.activateHandler("com.example.mycommand",
new AboutHandler());

ParameterizedCommand cmd =
commandService.createCommand("com.example.mycommand", null);

// check if the command can get executed
System.out.println(handlerService.canExecute(cmd));

// execute the command
handlerService.executeHandler(cmd);

逻辑层相关服务

IEventBroker

Eclipse 3.x中,事件处理使用Observer模式:事件接收者实现事件发布者指定的Listener接口,并注册到事件发布者。
这带来两个问题:

  • 一个Listener接口要写很多个实现,这些实现中的代码有重复
  • 事件发布者和接收者的生命周期紧耦合

Eclipse e4中,将OSGi的EventAdminAPI封装为事件服务,提供了基于发布、订阅机制的事件处理功能:EventBroker作为事件总线,通过EventBroker可以发布和订阅事件。

要使用e4事件服务,需要增加依赖插件:
* org.eclipse.e4.core.services
* org.eclipse.osgi.services

  • 获取EventBroker

e4中定义了org.eclipse.e4.core.services.events.IEventBroker接口,可以通过依赖注入、e4上下文等方式获取:

1
2
3
4
5
6
7
8
9
10
11
  @Inject
IEventBroker eventBroker;

@Inject
private IEclipseContext eclipseContext;
……
IEventBroker eventBroker = eclipseContext.get(IEventBroker.class);

- 发布事件

可以用`IEventBroker`的`post()`或`send()`方法,进行同步(synchronous)或异步(asynchronous)事件的发布:

boolean IEventBroker.post(String topic, Object data) // synchronous delivery

boolean IEventBroker.send(String topic, Object data) // asynchronous delivery

1
2
3
4
5
6
7

返回值为是否发生成功。


- 订阅事件

可以通过依赖注入或者`IEventBroker`的`subscribe()`方法订阅事件:

@Inject
@Optional
private void closeHandler(@UIEventTopic(‘’TOPIC_STRING’’) foo.Bar payload) {
//do something with payload
}

1
2


@Inject
IEventBroker eventBroker;

org.osgi.service.event.EventHandler closeHandler = new EventHandler() {
public void handleEvent(Event event) {
foo.Bar payload = (foo.Bar) event.getProperty(IEventBroker.DATA);
}
}

eventBroker.subscribe(TOPIC_STRING, closeHandler);
……
eventBroker.unsubscribe(closeHandler);

1
2
3
4
5
6

消息对象(payload)作为附件存储在`IEventBroker.DATA`属性中。对于`Dictionary`或`Map`等集合类型的消息,会将其中所有的值按照KEY添加为属性。

## Logger

Eclipse 3.x中,Log的接口和实现类分别为`org.eclipse.core.runtime.ILog`和`org.osgi.service.log.LogService`,可以使用`ServiceTracker`获取:

LogService getLog() {
fLogServiceTracker = new ServiceTracker(fBundleContext, LogService.class.getName(), null);
return (LogService) fLogServiceTracker.getService();
}

1
2
3
4

为了方便,在`Plugin`的基类中实现了`getLog()`方法,所有的`Plugin`子类可以直接使用。

在`org.eclipse.e4.core.services`插件中提供了`org.eclipse.e4.core.services.Logger`类,可以通过`@Inject`注解或使用`IEclipseContext`接口获取:

@Inject
private Logger logger;

//or use code:
Logger log = (Logger) context.get(Logger.class.getName());


# 实现自己的服务

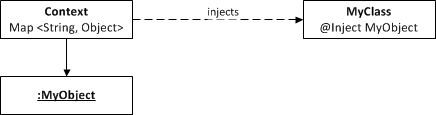
Usually services have two parts: the interface definition and the implementation. How these two are linked is defined by a context function , an OSGi service or plain context value setting (IEclipseContext). Please note that there can be more than one service implementation for an interface.

Tycho以一组maven插件的形式,支持Eclipse的plug-ins, features, update sites (based on p2) 、products等类型工程的构建。

Tycho是一个Maven插件,目标是使用Maven构建Eclipse插件,OSGI Bundle等工程。

如果说Maven的出现是一群Java程序员受不了繁琐的插件依赖管理,受不了冗长的ant build.xml文件而创造出来的,
那Tycho则是一群Eclipse、OSGi插件开发人员受不了重复地配置类似的Maven pom.xml而创造出来的。

Tycho以一组maven插件的形式,支持Eclipse的plug-ins, features, update sites (based on p2) 、products等类型的工程,
表现为不同的maven打包类型(packaging):

  • eclipse-plugin
  • eclipse-feature
  • eclipse-test-plugin
  • eclipse-repository
  • eclipse-target-definition

父工程

基于OSGi的工程通常会划分很多模块,对于Maven来说,一般通过一个父工程(parent)来管理所有模块的构建。父工程的packaging类型为pom.

为了使用Tycho,需要在父工程的pom文件中增加一些配置。

增加Tycho插件

父工程中定义的插件可以在所有子工程中使用:

1
2
3
4
5
6
7
8
9
10
11
12
13
14
<properties>
<tycho-version>0.16.0</tycho-version>
</properties>

<build>
<plugins>
<plugin>
<groupId>org.eclipse.tycho</groupId>
<artifactId>tycho-maven-plugin</artifactId>
<version>${tycho-version}</version>
<extensions>true</extensions>
</plugin>
</plugins>
</build>

定义bundle仓库

比如,基于Eclipse 4.3(Kepler)的RCP应用,使用了Texo、GeminiJPA等插件,需要如下的仓库定义:

1
2
3
4
5
6
7
8
9
10
11
12
13
14
15
16
17
18
19
20
21
22
<repositories>
<repository>
<id>Kepler</id>
<url>http://download.eclipse.org/releases/kepler</url>
<layout>p2</layout>
</repository>
<repository>
<id>Texo</id>
<url>http://download.eclipse.org/modeling/emft/texo/updates/interim</url>
<layout>p2</layout>
</repository>
<repository>
<id>GeminiJPA</id>
<url>http://download.eclipse.org/gemini/jpa/updates</url>
<layout>p2</layout>
</repository>
<repository>
<id>EclipseLink</id>
<url>http://download.eclipse.org/rt/eclipselink/updates/</url>
<layout>p2</layout>
</repository>
</repositories>

定义目标

定义不同的目标平台:

1
2
3
4
5
6
7
8
9
10
11
12
13
14
15
16
17
18
<plugin>
<groupId>org.eclipse.tycho</groupId>
<artifactId>target-platform-configuration</artifactId>
<configuration>
<environments>
<environment>
<os>linux</os>
<ws>gtk</ws>
<arch>x86</arch>
</environment>
<environment>
<os>macosx</os>
<ws>cocoa</ws>
<arch>x86_64</arch>
</environment>
</environments>
</configuration>
</plugin>

如果要发布比较复杂的目标,比如Eclipse Product的发布,需要单独构建eclipse-target-definition类型的子工程。

为现有工程生成pom

Tycho提供了一个工具,可以为现有的Eclipse Plugin、Feature等工程生成pom文件,从而将其整合到Tycho的管理之下。

该工具也是基于maven的,只需要在工程文件夹执行命令:

1
mvn org.eclipse.tycho:tycho-pomgenerator-plugin:generate-poms -DgroupId=thinkinside.tangle

生成的pom文件举例如下:

1
2
3
4
5
6
7
8
9
<?xml version="1.0" encoding="UTF-8"?>
<project xsi:schemaLocation="http://maven.apache.org/POM/4.0.0 http://maven.apache.org/xsd/maven-4.0.0.xsd" xmlns=" http://maven.apache.org/POM/4.0.0"
xmlns:xsi="http://www.w3.org/2001/XMLSchema-instance">
<modelVersion>4.0.0</modelVersion>
<groupId>thinkinside.tangle</groupId>
<artifactId>tangle-app</artifactId>
<version>1.0.0-SNAPSHOT</version>
<packaging>eclipse-plugin</packaging>
</project>

由于种种原因,Eclipse Plugin工程的配置内容分散在多个文件中,包括:

  • OSGi的配置文件:MANIFEST.MF
  • 插件工程构建文件:build.properties
  • 插件定义文件:plugin.xml
  • 产品描述文件:.product

这些文件中的配置项有重复,开发人员要保证各文件中的相关配置的一致性。

Tycho在生成pom文件时,会检查这些配置文件,将其中的配置项写入pom文件中。

Tycho的逻辑是以上述标准的配置文件优先。比如,在pom文件中没有定义依赖关系,而是以MANIFEST.MF中定义的依赖为准。

如果现有工程已经有了pom文件,还可以使用Tycho进行更新:

1
mvn org.eclipse.tycho:tycho-versions-plugin:update-pom -Dtycho.mode=maven

“目标定义”子工程

前面提到,如果要发布比较复杂的目标,比如Eclipse Product的发布,需要单独构建eclipse-target-definition类型的子工程。

在”目标定义”子工程中创建.product文件,然后在pom文件中添加:

1
2
3
4
5
6
7
8
9
10
11
12
13
14
15
16
17
18
19
20
21
22
23
24
25
26
27
28
29
<build>
<plugins>
<plugin>
<groupId>org.eclipse.tycho</groupId>
<artifactId>tycho-p2-director-plugin</artifactId>
<version>${tycho-version}</version>
<executions>
<execution>
<!-- install the product for all configured os/ws/arch environments
using p2 director -->
<id>materialize-products</id>
<goals>
<goal>materialize-products</goal>
</goals>
</execution>
<!-- (optional) create product zips (one per os/ws/arch) -->
<execution>
<id>archive-products</id>
<goals>
<goal>archive-products</goal>
</goals>
</execution>


</executions>
</plugin>
</plugins>
</build>

“目标定义”子工程中还可以使用”目标定义文件(Target Definition, *.target)“进行复杂的配置。
可以参考这里的说明,也可以查看GitHub上的例子的例子。

Test工程

与专门的测试工具Pax Exam相比,Tycho test使用起来会更简单。当然前提是测试由Tycho构建的OSGi应用。

Tycho将一个”Fragment”工程包装成Maven工程,可以在其中编写测试代码,然后使用”JUnit Plug-in Test”执行测试。

对比Maven-Bundle-Plugin

Maven-Bundle-Plugin提供了与Tycho不同风格的另一种构建OSGi的maven插件。关于二者的对比,可以参考这里